Freebie Friday – Pilgrim Boy

I’ve been learning how to make my digital cutter files available in different file formats, so I can share  them with you! Each Friday, I will post a link for a free file for your digital cutter! Downloads will be available for two weeks and are for personal use only. Link is at the bottom of the post. Here is this week’s freebie. Enjoy!
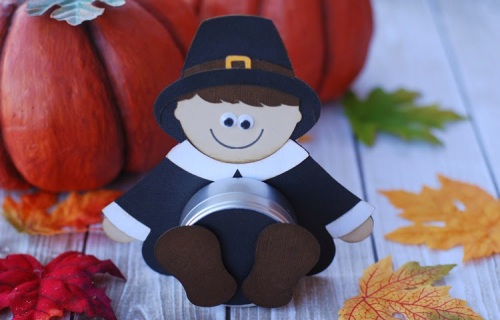
Here is the project I made

Sorry, this download has expired.

Don’t miss any of my Freebie Files. Sign up to get Burton Avenue updates delivered to your inbox!

Email: 

Be sure to check out these great linky parties:

Monday Craftastic MonCraft-O-Manic MonMade By You MonMade With Love Mon,Making the World CuterMarket Yourself MonMarvelous Mess MonMetamorphosis MonMotivate Me Mon, Tuesday Anti Procrastination TuesGet Your Craft OnHome Stories A to Z,Nifty Thrifty TuesShow Me What You GotTake A Look TuesTime To Shine, Wednesday Linkin’ with LunaLook What I MadePenny Pinching PartyShow And Share,We Did It WedWhat I Whipped Up Wed Whatever Goes WedWow Me WedWow Me Wed, Thursday Taylor House Thursday, A Crafty SoireeHookin’ Up, Strut Your Stuff ThurCatch as Catch CanTransformation ThurUnder $100 Linky Party, Friday Flaunt It Fri, I’m Lovin’ It FriInspiration Fri, Remodelaholic FriWeekend WanderWeekend Wrap-UpSaturday Show & Tell SatSunday Just Something I Whipped UpNifty Thrifty SunSun ShowcaseSun ScoopThink Pink Sun

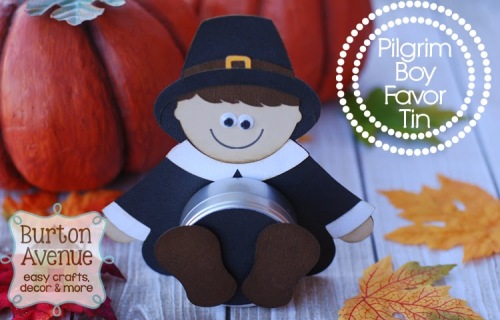
Pilgrim Boy Favor Tin

I wanted to get this project up last week, but life happened and it got pushed aside.  But, I wanted really wanted to get it up before Thanksgiving.  There might be a few last minute crafters (like me) that can make these this year.  If not, Thanksgiving will come again next year and you can use it then!
I’ve made a couple of these favors tins in the past and I think they are so cute.  I wanted to add a few more for Thanksgiving.  These are perfect to use at a table or to give away to friends and family.

Here is what you’ll need:
Cardstock (I used black, brown, white, tan, and goldenrod)
Googly Eyes
Foam Sticky Tabs
Favor Tins (I got mine at Michaels in the wedding section)
Glue
Distress Ink (optional)

Here is what you’ll do:

First, you’ll need to cut out the pieces and, if desired, distress with ink. I used my digital cutter, but most of the shapes are pretty simple and can be cut by hand.

Next, glue the pieces onto the black body in this order.
Hands
Sleeve Cuffs
Collar
Face
Hair
Hat Top
Hat Band
Hat Buckle
Hat Brim

Attach the feet to the circle with foam sticky tabs.  Glue on the googly eyes and glue the back of the favor tin to the body. Attach the circle with feet onto the lid of the favor tin with foam tabs.  Add a mouth, if desired.  Fill with some yummy treats.

So cute!

I hope you all have a happy Thanksgiving.

I’ll be sharing the free digital cut file today for both the pilgrim girl and boy! Come back later and grab them both.

Freebie Friday – Pilgrim Girl

I’ve been learning how to make my digital cutter files available in different file formats, so I can share  them with you! Each Friday, I will post a link for a free file for your digital cutter! Downloads will be available for two weeks and are for personal use only. Link is at the bottom of the post. Here is this week’s freebie. Enjoy!
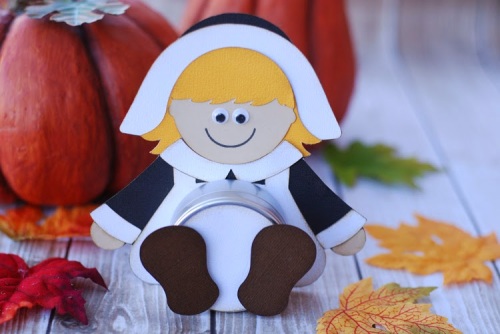
Here is the project I made

Sorry, this download has expired.

Don’t miss any of my Freebie Files. Sign up to get Burton Avenue updates delivered to your inbox!

Email: 

Be sure to check out these great linky parties:

Monday Craftastic MonCraft-O-Manic MonMade By You MonMade With Love Mon,Making the World CuterMarket Yourself MonMarvelous Mess MonMetamorphosis MonMotivate Me Mon, Tuesday Anti Procrastination TuesGet Your Craft OnHome Stories A to Z,Nifty Thrifty TuesShow Me What You GotTake A Look TuesTime To Shine, Wednesday Linkin’ with LunaLook What I MadePenny Pinching PartyShow And Share,We Did It WedWhat I Whipped Up Wed Whatever Goes WedWow Me WedWow Me Wed, Thursday Taylor House Thursday, A Crafty SoireeHookin’ Up, Strut Your Stuff ThurCatch as Catch CanTransformation ThurUnder $100 Linky Party, Friday Flaunt It Fri, I’m Lovin’ It FriInspiration Fri, Remodelaholic FriWeekend WanderWeekend Wrap-UpSaturday Show & Tell SatSunday Just Something I Whipped UpNifty Thrifty SunSun ShowcaseSun ScoopThink Pink Sun

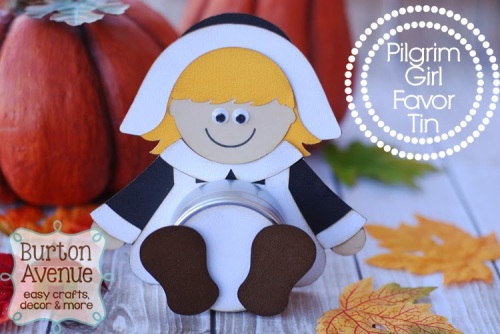
Pilgrim Girl Favor Tin

I wanted to get this project up last week, but life happened and it got pushed aside.  But, I wanted really wanted to get it up before Thanksgiving.  There might be a few last minute crafters (like me) that can make these this year.  If not, Thanksgiving will come again next year and you can use it then!
I’ve made a couple of these favors tins in the past and I think they are so cute.  I wanted to add a few more for Thanksgiving.  These are perfect to use at a table or to give away to friends and family.

Here is what you’ll need:
Cardstock (I used black, brown, white, tan, and goldenrod)
Googly Eyes
Foam Sticky Tabs
Favor Tins (I got mine at Michaels in the wedding section)
Glue
Distress Ink (optional)

Here is what you’ll do:

First, you’ll need to cut out the pieces and, if desired, distress with ink. I used my digital cutter, but most of the shapes are pretty simple and can be cut by hand.

Next, glue the pieces onto the black body in this order.
White Hat
Back Hair Piece
Apron
Hands
Sleeve Cuffs
Face
Hair Front
Collar

Attach the feet to the circle with foam sticky tabs.

 Glue on the googly eyes and glue the back of the favor tin to the body. Attach the circle with feet onto the lid of the favor tin with foam tabs.  Add a mouth, if desired.  Fill with some yummy treats.

So cute!
I hope you all have a happy Thanksgiving.

I’ll be sharing the free digital cut file today for both the pilgrim girl and boy! Come back later and grab them both.

Freebie Friday – Be Thankful

I’ve been learning how to make my digital cutter files available in different file formats, so I can share  them with you! Each Friday, I will post a link for a free file for your digital cutter! Downloads will be available for two weeks and are for personal use only. Link is at the bottom of the post. Here is this week’s freebie. Enjoy!
Here is the project I made


Sorry, this download has expired.

Don’t miss any of my Freebie Files. Sign up to get Burton Avenue updates delivered to your inbox!

Email: 

Be sure to check out these great linky parties:

Monday Craftastic MonCraft-O-Manic MonMade By You MonMade With Love Mon,Making the World CuterMarket Yourself MonMarvelous Mess MonMetamorphosis MonMotivate Me Mon, Tuesday Anti Procrastination TuesGet Your Craft OnHome Stories A to Z,Nifty Thrifty TuesShow Me What You GotTake A Look TuesTime To Shine, Wednesday Linkin’ with LunaLook What I MadePenny Pinching PartyShow And Share,We Did It WedWhat I Whipped Up Wed Whatever Goes WedWow Me WedWow Me Wed, Thursday Taylor House Thursday, A Crafty SoireeHookin’ Up, Strut Your Stuff ThurCatch as Catch CanTransformation ThurUnder $100 Linky Party, Friday Flaunt It Fri, I’m Lovin’ It FriInspiration Fri, Remodelaholic FriWeekend WanderWeekend Wrap-UpSaturday Show & Tell SatSunday Just Something I Whipped UpNifty Thrifty SunSun ShowcaseSun ScoopThink Pink Sun

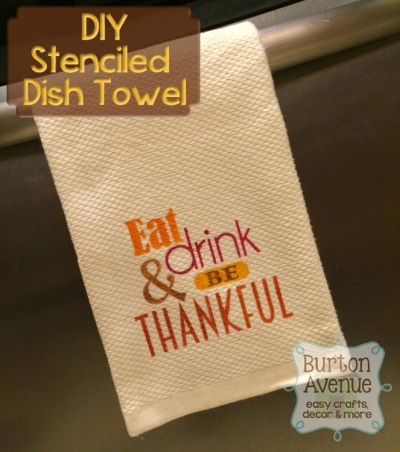
DIY Stenciled Dish Towel

Thanksgiving is less than two weeks away. Oh, this year is going by so fast.  With the holidays coming, there is always so much more cooking and baking going on.  I know the more time I spend in the kitchen, the more dish towels I use. Here is a fun project to dress up those plain dish towels and make them a little more festive for this holiday season. 
To make these towels you will need:
Dish Towels
Vinyl Stencil
Paint & Paintbrush
Mod Podge (Optional)
Start by applying the vinyl stencil to your towel. The towel I used was textured, so to help stop paint from bleeding through the stencil, I first applied a coat of Mod Podge.
After the Mod Podge dries, carefully paint all of the words.
Carefully remove the vinyl stencil. I wanted the “BE” to stand out a little more, so I cut out the stencil and peeled away the B and E instead of the frame. Then, I placed it on the towel and painted the letters brown.
Now, I have a cute dish towel that is perfect for Thanksgiving. 
Come back later for the free digital file to create your own!
Be sure to check out these great linky parties:

Monday Amaze Me Mon, Craftastic Mon, Craft-O-Manic Mon, Homemaker Mon, Inspire Me Mon, Link Party Mon, Mad Skills, Mad Skills Mon, Made By You Mon, Made With Love Mon, Make Something Mon, Making Mon Marvelous, Making the World Cuter, Market Yourself Mon, Marvelous Mess Mon, Masterpiece Mon, Metamorphosis Mon, Motivate Me Mon, Blog Party, Project Parade, Share Mon, Thrifty Décor Chick, Unwasted Homemaking, Craft Catwalk, Craftaholics Anonyomous Tuesday All Thingz Related, Anti Procrastination Tues, Get Your Craft On, Handmade Tues, Home Stories A to Z, It’s Sew Fun, maze Me August, Nifty Thrifty Tues, Power Of Paint, Show Me What You Got, Sizzle into Summer, Take A Look Tues, Teriffic Under Ten Tues, Time To Shine, Wednesday Anything Goes, DIY Under $5, Hoo’s Got Talent?, Idea Sharing Wed, Linkin’ with Luna, Look What I Made, Penny Pinching Party, Primp Your Stuff Wed, Show And Share, Show And Tell, We Did It Wed, What I Made Wed, What I Whipped Up Wedn, What’s Up Wed, Whatever Goes Wed, Wicked Awesome Wed, Wow Me Wed, Wow Me Wed, Thursday Taylor House Thursday, A Crafty Soiree, Almost Fri Flaunts, Catch A Glimpse Thur, Commercial Break Thursday, Get Your Brag On, Hookin’ Up, Share Awesomness Thur, Show Off Your Stuff, Strut Your Stuff ThurCatch as Catch Can, Transformation Thur, Under $100 Linky Party, Friday Bacon Time, Delicate Construction, Fabulous Fri, Fantabulous Fri, Feature Your Sassy Sites, Feature Yourself  Fri, Flaunt It FriFree For All Fri, Fri Favorites, Fri Link Party, Frugal Fri, Frugalicious Fri, Hodgepodge Fri, I’m Lovin’ It Fri, Inspiration Fri, Lovely Crafty Weekend, Remodelaholic Fri, Show and Share Day, Scissors & Spatulas, Weekend Wander, Weekend Wrap-Up, Whatcha Got Weekend, Saturday Check Me Out Sat, Sat is Crafty Day, Sat Nite Special, Sat Spotlight, Show & Tell Sat, Summer Lovin’ Sat SoireeSunday Just Something I Whipped Up, Nifty Thrifty SunSister Sister Sun, Sun Showcase, Sun Scoop, Think Pink Sun, You’re So Creative

Freebie Friday – Trick or Treat

I’ve been learning how to make my digital cutter files available in different file formats, so I can share  them with you! Each Friday, I will post a link for a free file for your digital cutter! Downloads will be available for two weeks and are for personal use only. Link is at the bottom of the post. Here is this week’s freebie. Enjoy!
Here is the project I made

Sorry, this download has expired.
Don’t miss any of my Freebie Files. Sign up to get Burton Avenue updates delivered to your inbox!

Email: 

Be sure to check out these great linky parties:

Monday Craftastic MonCraft-O-Manic MonMade By You MonMade With Love Mon,Making the World CuterMarket Yourself MonMarvelous Mess MonMetamorphosis MonMotivate Me Mon, Tuesday Anti Procrastination TuesGet Your Craft OnHome Stories A to Z,Nifty Thrifty TuesShow Me What You GotTake A Look TuesTime To Shine, Wednesday Linkin’ with LunaLook What I MadePenny Pinching PartyShow And Share,We Did It WedWhat I Whipped Up Wed Whatever Goes WedWow Me WedWow Me Wed, Thursday Taylor House Thursday, A Crafty SoireeHookin’ Up, Strut Your Stuff ThurCatch as Catch CanTransformation ThurUnder $100 Linky Party, Friday Flaunt It Fri, I’m Lovin’ It FriInspiration Fri, Remodelaholic FriWeekend WanderWeekend Wrap-UpSaturday Show & Tell SatSunday Just Something I Whipped UpNifty Thrifty SunSun ShowcaseSun ScoopThink Pink Sun